
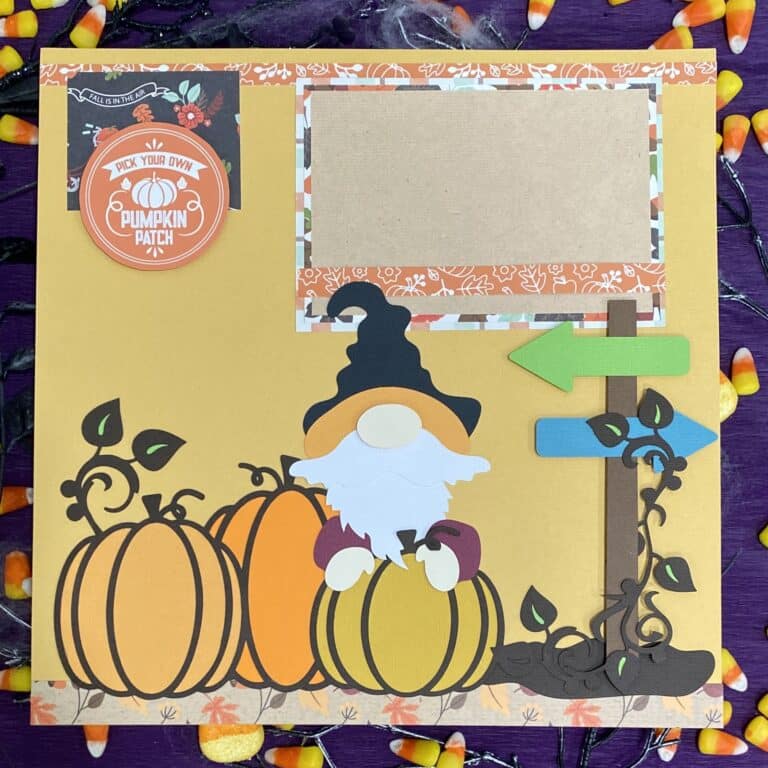
Quick and Fun Frankenstein Popcorn Wrappers for Party Favors
We may earn a small commission for purchases made through affiliate links in this post. For more information go to our Privacy Policy.
Welcome to another exciting Halloween craft tutorial! In today’s project, we’ll be creating a spooktacular Frankenstein-themed popcorn wrapper that’s perfect for your Halloween festivities. If you’re looking for a fun and creative way to jazz up your Halloween treats, you’re in for a treat yourself.
Materials Needed:
- Frankenstein Popcorn Wrapper SVG
- Cricut machine or cutting tool
- Patterned papers in various Halloween-themed designs
- Glue or adhesive of your choice
- Foam dots or pop dots (optional for added dimension)
- Half-inch score tape or double-sided tape
- Scissors or craft knife
- Optional: stamps, ink, printer for sentiment
All the general supplies for scrapbooking and cardmaking that I use are listed below. Pattern papers and cardstocks are not specific. Use what you have (unless you were eyeballing that new paper release…).
NOTE: This file is part of the 2023 Halloween Craft Stash Challenge. If you are working on this project after the challenge is complete, you can still participate. The file is sold individually in the shop and it is also included in the Mega Halloween Bundle.

Step 1: File Upload and Preparation:
Choose the file that works best with your machine and cutting software (SVG for Cricut, PNG for Silhouette, etc.)
Step 2: Preparing the Coffin Shape:
- Ungroup the imported files.
- Identify the score lines on the coffin shape – these will become the fold lines.
- Convert the score lines to score settings to ensure accurate folding.
- Attach the score lines to the coffin base, ensuring proper alignment. Don’t forget you can arrange layers by sending them to the back or front as needed.
Step 3: Choosing Patterned Papers:
The fun part begins! Pull different colored patterned papers from your stash to add depth to your project. The pieces that are colored pink within the file represent pattern papers.
Step 4: Assembling the Body of Frankenstein:
- Fold your score lines before gluing any cover pieces on to keep your lines crisp.
- Attach layers to each section as shown in the video.
- Assemble the base shape by using adhesive to secure the front flap and back flap on each panel.
- This is where Frankenstein comes to life—add his hair, eyes, scars, and bolts.
Step 5: The Popcorn Pocket:
Constructing the popcorn pocket is a breeze. Use half-inch score tape to attach the sides and bottom of the pocket. Remember to fold and secure the paper carefully to create a sturdy and functional pocket for your treats.
Step 6: Final Touches and Completion:
Put the finishing touches on our project by adding sentiments. Use stickers, rub-ons, stamps, or handwritten messages to personalize your Frankie the Monster popcorn wrapper.
Don’t forget to share your creation with the rest of us in the Lemony Fizz Paper Crafters Facebook Group.
General Scrapbooking and Cardmaking Supplies that I Use
Very cute! Thank you for sharing your Frankie with us👍
This is very cute! Please know that I can hardly hear your verbal instructions even with my volume all the way up! Thank you – your work is just wonderful!
Thank you for letting me know Cynthia.
My kids bought me a microphone to use for recording. Unfortunately, it hinders more than it helps. I used it for most of the videos…so there will be a few more frustrating moments. I’ve tossed it in the garbage..and will be ordering a different type.
Newer videos will be better (fingers crossed).
Love this
The cutest Frankie ever! Love this project! Your videos are easy to follow and I really like that you give alternate ideas while you are assembling. Thank you so much for sharing!
This is super cute, no wait, I mean spooky. My granddaughter would love to receive this in her Trick or Treat bag.
Frankie is adorable! My grandson loves popcorn. What a festive way to give him a pack!