DIY Halloween Treat Bag: a Fun Paper Craft for Kids
We may earn a small commission for purchases made through affiliate links in this post. For more information go to our Privacy Policy.
These Halloween treat bags will have you craving all things pumpkin spice, autumn colors, and warm sweaters!
Each year, you need to find another creative idea to pack up the cookies, popcorn balls, and fun season candies to share with friends.
Class treats are always fun if they are themed (and depending on the age, spooky is not always better). Even some adults like the “cuteness” of Halloween more than the scary.
How about a quick and easy Halloween treat bag that won’t leave you swearing at your pile of craft supplies?

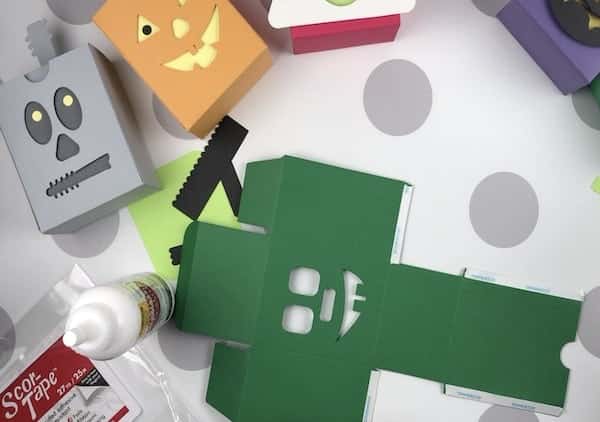
What You Need
12 x 12 cardstock – 1 sheet per bag (choose the bags and colors you like best)
Scrap pieces of cardstock for details
Tacky Glue or Score Tape
Halloween Treat Bag SVG File Set
A Cricut or Silhouette (or Brother Cut and Scan)
The file comes with sizing directions. You can watch the video here to help with prepping the file in Cricut Design Space and how to put the pieces together to make the boxes. You can also bookmark this post and use it as a guide. Keep reading!
Ready to Make Spooky Characters?
The first thing you need to do is import the SVG file into your design program. I have a Silhouette and a Cricut, but I will only be providing instructions for the Cricut. Because it’s the only machine that I use now! It’s more reliable and I don’t waste as many supplies (or say as many cuss words!)
Design Software Steps:
Once you have the design imported into your program, you need to change the height to 11.5 inches.
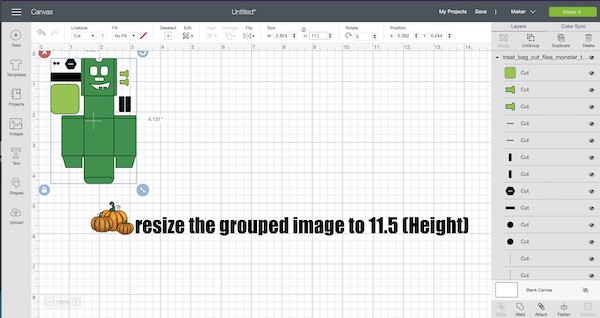
The elements are currently grouped so just change the setting for everything all at once. We need the box to be as tall as possible. The other elements will stay in proportion while they are grouped.
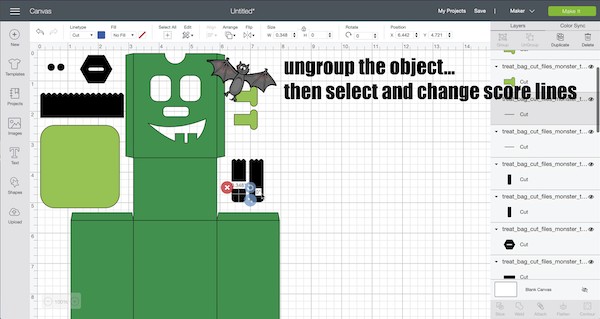
Now that the file is resized, you can ungroup the elements.
You need to change a few lines to SCORE. All the fold lines need to be selected and changed.
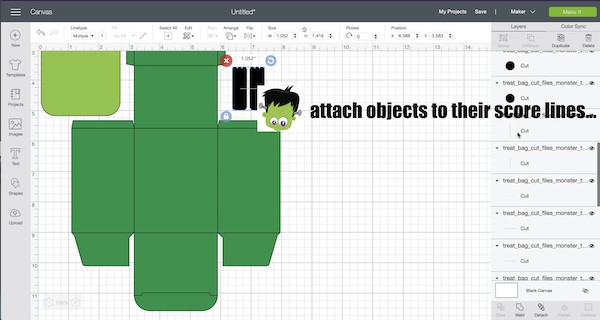
After you change your score lines, ATTACH them to the pieces they will be scored on. You don’t want them moving to the top of the cutting mat and being a separate cut/score mat. You need them to stay with their object!
Follow the directions in Cricut Design Space to change mats and cardstock colors until all pieces are cut.
Pro Tip: Pile your detail pieces and the bags in the order you cut them out. Don’t just throw them all in a pile. You don’t want to sort all those pieces and figure out which characters go with which pieces! If you don’t have time to assemble them right now…put them in sandwhich baggies and label them with a sharpie or a sticky note inside!
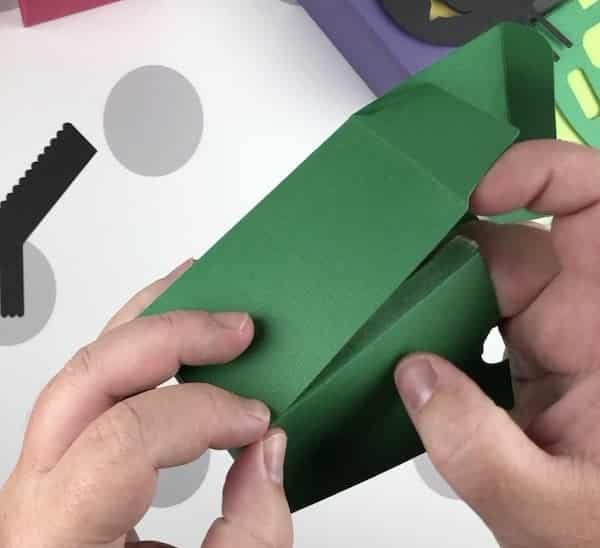
Assembling the Bags:
Now for the fun part. You will be surprised how fast these go together!
- Fold your box on the score lines.
- Use pop-up dots to add the back faceplate (the color piece behind the faces).
- Add glue or score tape (this is my new favorite supply!) to the OUTSIDE of the flap.
- Place the bottom flaps inside the box and on the bottom panel.
- Place the side panels to finish sealing up the box.
- Add the detail pieces (hair, stems, eye-balls, bolts, and face decorations).
- Repeat for more spooky Halloween friends.
- Add candy or treats.
- Share!
A Whole Spooky Crew
That’s it. How fun and easy was that?
Did you add anything extra to dress your characters up a bit? You can share your creations on Instagram or Facebook. Just tag me (@lemonyfizzcrafts) or use the hashtag #lemonySVGfiles
I’m excited to see your sweet (and spooky) Halloween treat bags!