
What All Can You Do with Cricut Design Space: A Complete Tutorial for Beginners
We may earn a small commission for purchases made through affiliate links in this post. For more information go to our Privacy Policy.
Learning Cricut Design Space will help you to up your crafting game in a major way. Knowing how to use your machine along with this Cricut software will allow your machine to reach its full potential and help you unleash your creativity.
You want to make something beautiful with your own two hands. And, if I had to guess, you want people to be inspired by your work and impressed with your skills. Using a Cricut machine is just one part of your creative process. Unfortunately, it can be a daunting task… at first.
This Guide Will Help You Enjoy Your Machine
When you look at it your Cricut, you should get all giddy and have an excited bubbly feeling in your belly. Not a feeling of dread!
If you haven’t used your machine yet, it’s time to get started! You can get this entire guide (and much much more) in printable form to use as you go through the process. Start using that expensive dust collector!
Note: If you still haven’t bought a machine and you think you are ready, here’s the best Cricut machine to buy!
Knowing how to use Design Space with all its tips and tricks will allow you to work faster, save materials and money, and finish a project without frustration. Since I want you to feel successful instead of ready to beat your machine with a bat, I’ve put together this comprehensive guide.
You can quickly learn all the ins and outs of Cricut Design Space, and this tutorial walks you through the tools and icons you’ll find in the Cricut design software. I have found that the best way to figure all this stuff out is to go through it step-by-step, so that’s what we’re going to do.
What Is Cricut Design Space
In short, it’s a Cricut software that communicates with your machine and tells it how to work. In previous Cricut designs, you had to use a cartridge and tell the machine by pushing buttons and resizing your designs.
Now, you have the ability to easily upload entire images and fonts in different file formats (PNG, JPG, SVG, etc.) and manipulate them to fit your design needs.
You can still use images from your Cartridges or purchase designs in Cricut Access sold by designers and Cricut users if you prefer. However, you don’t need to because you can make your own designs and cut files or upload others.
NOTE: If you are still wondering how a Cricut machine works and which one to purchase, read What A Cricut Is And The Best One To Buy. It’s a great post about the best machine for beginners!
You can only access the design program and install it on your desktop, iOS, or Android device.
A Cricut Software Tutorial For Beginners
Purchasing a Cricut cutting machine is a MAJOR investment. They’re expensive, and spending all that money is a waste if you don’t learn to use the Cricut software.
Cricut Design Space is a great tool for beginners and experienced crafters, alike. It may seem overwhelming at first, but you will get the hang of it quickly and wonder why you ever felt intimidated by the dashboard.
NOTE: This is a LARGE Cricut tutorial. Be sure to bookmark it so you can use it as a reference whenever you fire up your machine!
Pro Tip: If you have any experience with Adobe Illustrator or Inkscape, you will probably find Design Space intuitive and fairly easy to use. There are a few tips and tricks that you can use to touch up your projects once they’re loaded and ready to cut.
Get Familiar With The Main Work Area
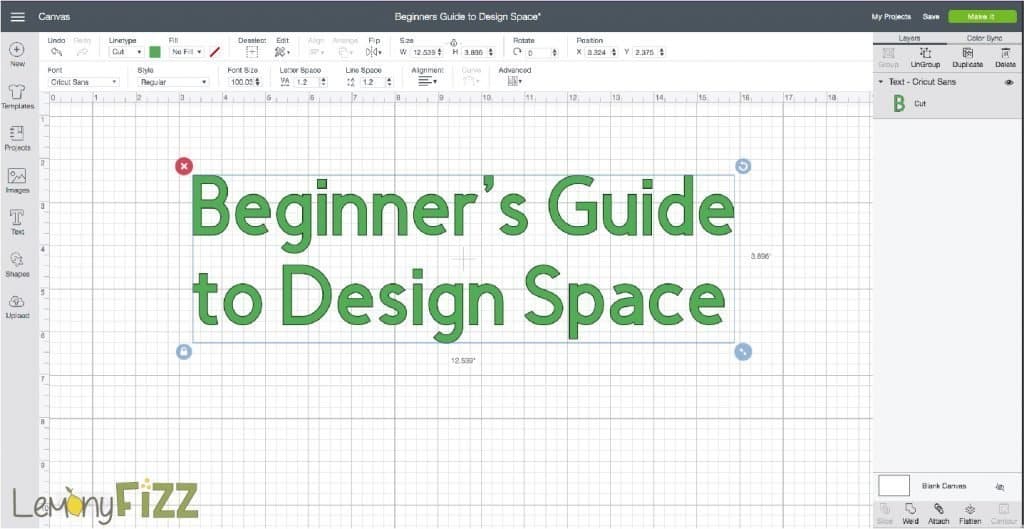
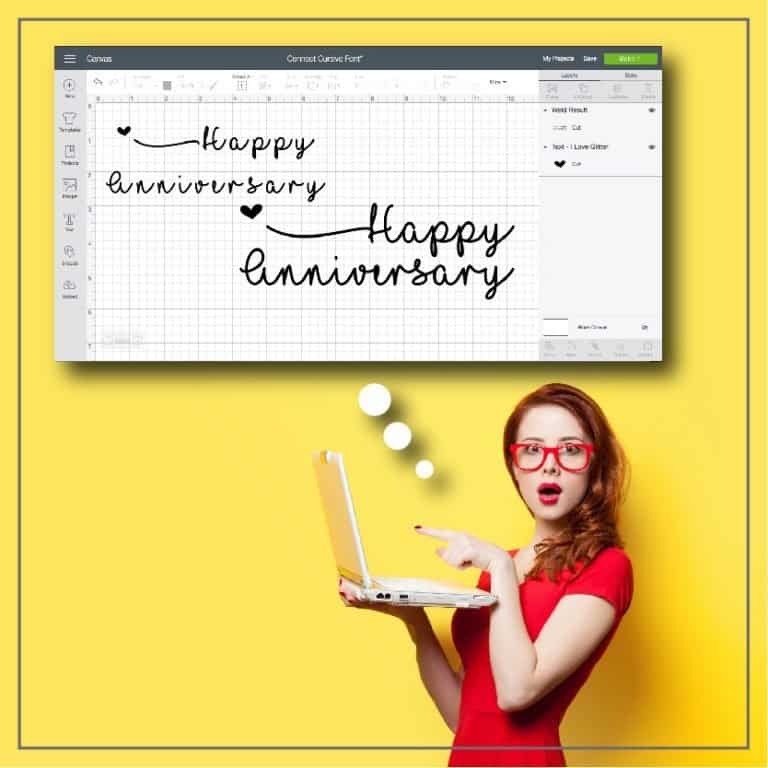
The main area that you design and work in is called the CANVAS. Just think of this as your art space. It’s where you create digital art and prep it to become a 3D version of itself.
The Cricut Design Space canvas is where you do all of your editing and then direct the machine to cut, score, or draw.
Once you have the software installed on your device, you’ll see a little green square with the Cricut symbol on your main toolbar (if you’re on a MAC).
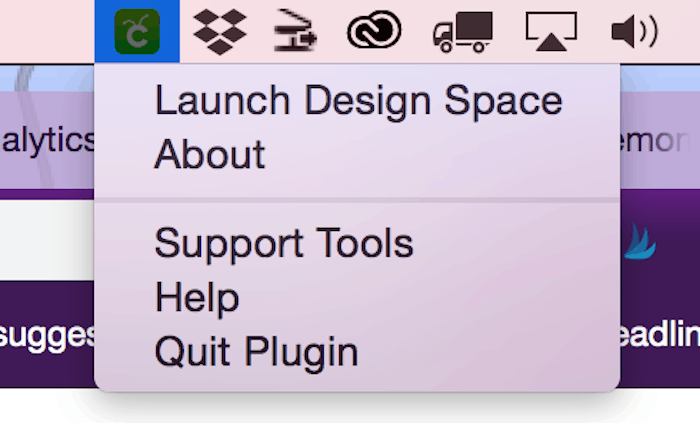
When you click on this icon it will give you a set of options. Click on Launch Design Space.
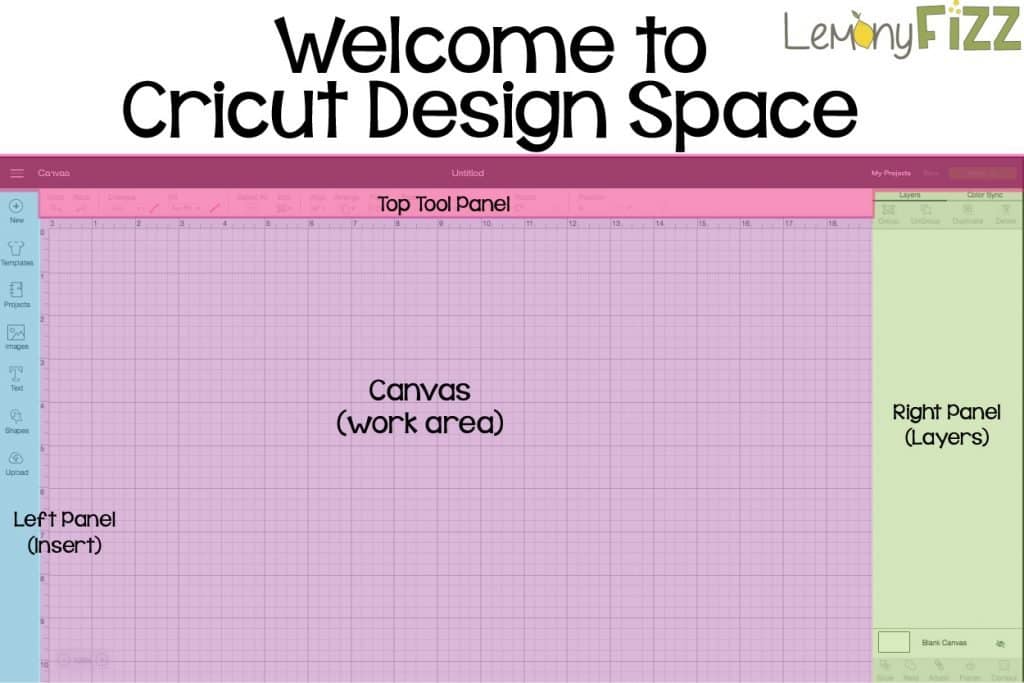
You will see a screen like this:
We are going to cover every single tool on this canvas area. To make it easy to follow, I will divide the screen up into sections:
- Top panel (PINK) – Editing area
- Left panel (BLUE) – Insert area
- Main canvas (PURPLE) – Main work area
- Right panel (GREEN) – Layers panel
Let’s get started!
Cricut Design Space Top Bar Menu
The top panel (pink) in Design Space is where you will edit and arrange elements on the canvas. You can:
- Choose your font type
- Change the size of objects
- Align or distribute objects
- Rotate objects
- Save your project
- Hit “make it” button
- And more
All of these Cricut Design Space tools are clearly labeled. If you aren’t sure about a tool, feel free to experiment on a shape or re-read this post!
The Hamburger icon (3 bars on the left) is a toggle menu that gives you all your account information, machine information, calibrations, preferred materials list, etc. There is a ton to dig into here.
The most important item at this point would be NEW MACHINE SETUP if you haven’t done that yet. The second most important would be CRICUT ACCESS.
If you don’t have files that you’ve purchased from other places or if you don’t know how to design your own files yet, you will want to find cut files in the Cricut shop (also called Cricut Access).
Project Name
Each time you start a new project, it will say “Untitled.” You haven’t specified what the project is or saved it yet. It’s a blank document similar to a Word document or a Google Doc.
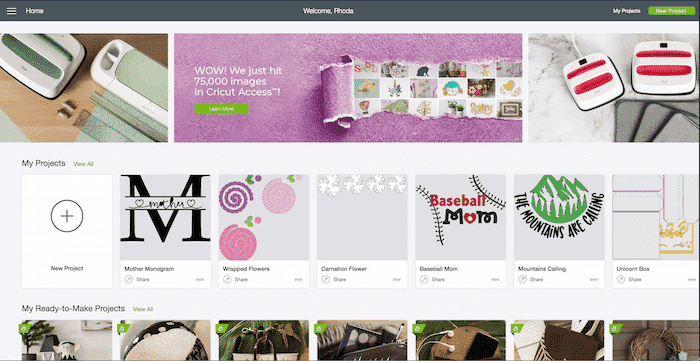
My Projects
When you click on this link, it will take you to any project you have saved or made previously. You can organize this area and delete projects that didn’t work or that won’t be remade in the future.
The wonderful part about this section is that if you decide to remake an item, all of your design features are already saved and ready to go. There’s no need to reinvent the wheel (or the project 😉).
Save
This option will be available once you have put something on your canvas. It will remain greyed out until you have a design element ready to go. As with anything you design or work on, you should save regularly.
Design Space is entirely on the cloud but DO NOT trust it to autosave for you. Like any piece of technology, it will glitch on you at the most inopportune moments (don’t ask me how I know)!
Make It!
When you’re all finished adjusting your design and designating cut lines and score lines, you’ll click on the MAKE IT button. Then, your machine will walk you through the process of loading your mats and finalizing your cut project.
I recommend adding an object onto your canvas so you can follow along or experiment with the editing menu as you read more later.
Cricut Design Space Left Panel – Shapes, Images, And Templates
The panel on your left-hand side is where you will start a new project, access your previous projects, and find designs and images to manipulate and create.
Let’s start at the top and work our way down.

New: click to create or replace an existing project on the canvas area.

Template
Search for templates in this section so you can see how your design would look on the material.
There are way too many objects to list here. Banners, aprons, shirts, backpacks, bowls, chairs, and much more!
NOTE: The template itself will not be cut out – it’s just there for you to help visualize your project. Essentially, it’s a mock-up of your design.

Projects
This will open a window with your previously saved/made projects. It’s super handy if you need to remake a project making it unnecessary to redesign the whole thing from scratch!
It also has a drop-down menu so you can choose a project from the HUGE library of Cricut projects. You can find:
- Coloring pages
- Free projects for different machine types
- Ready to make projects
- Cards
- Projects for baby
- And much more!
If you want to be creative and can’t think of a project to make, then this is the place to go for inspiration!
There is a “Green A” to show which projects are available in Cricut Access. You can also mark projects as favorites and then visit your list when you’re ready to create a design.

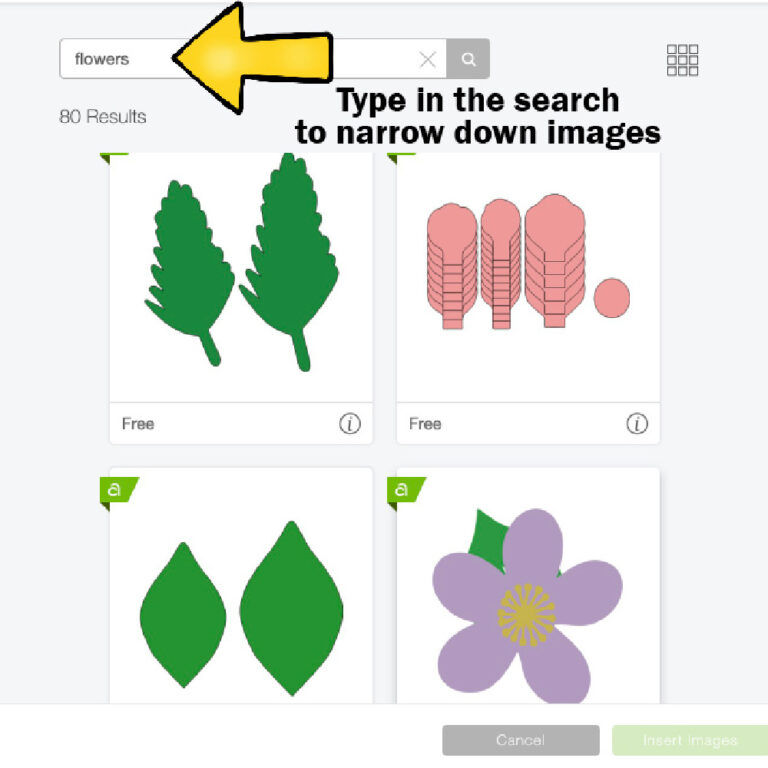
Images
This section works similarly to PROJECTS. You’ll find various cut files to choose from, and you can search by IMAGE, CATEGORY, or CARTRIDGE.
The CARTRIDGE option has sets of images that you may need to purchase separately because not all of them are included in Cricut Access. Usually, the Trademarked brands are not included (Disney, Sesame Street, etc.)

Text
Select this tool when you want to add type to your canvas. Click on the text button and then start typing in the little window that pops up on your canvas.

Shapes
These are your basic shapes. You can use these as simple elements or mix and match them to design complicated works of art. You are only limited by your imagination!
Just remember… all great images and art are made up of just these basic shapes!
- Square
- Triangle
- Pentagon
- Hexagon
- Star
- Octagon
- Heart
Score Line
The score line feature is how you can add a line to your design and have your machine score it for folding. Use this feature for any paper art where you need scored lines for intricate folds (like the designs on 3DSVG).

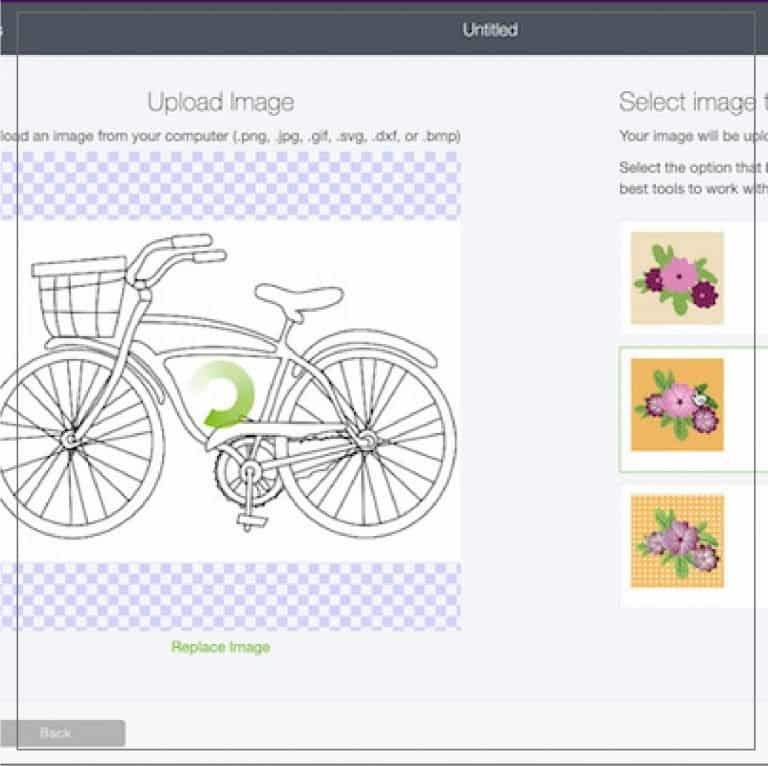
Upload
In my opinion, this is the best option in the whole program. You can upload any image in multiple formats and use it to create your own project.
There are loads of free designs (including in the Lemony Fizz library) and some gorgeous paid files available.
Cricut Design Space will walk you through a set of steps when you upload an image and will add it to your project library so you can use it again in the future.
Cricut Design Space Canvas Area
This is the main design area (purple work area) and where you will see all the elements and objects that make up your project.
Click on design features and then use the following tools and functions to manipulate your design and prep it for cutting, drawing, or scoring.
Canvas Rulers And Grid
Your canvas is broken up into a grid. You can position objects on the x and y-axis by using one of the tools in your toolbar.
The canvas is a digital representation of your cutting mat. What you see on the screen will be transferred in one way or another to your cutting mat (sometimes exactly as you see it, sometimes in ways that maximize materials).
If you want to change the measurements from inches to centimeters, you can do this by clicking on the TOGGLE button (in the hamburger menu) in the top left corner and then selecting SETTINGS. A window will pop up with all your available options for the design space. Set it up in a way that works for you and your creative style.
Selection
You can see which layers you have selected by looking at the blue bounding box surrounding the object. There is a different way to modify the selection on each of the 4 corners. When an object is selected, you can also edit or manipulate it with the Cricut layer attributes panel on the right-hand side.
- Top left corner – Red X. You can delete the selection by clicking on that button.
- Upper right corner – Curved arrow. You can use this corner to rotate your design around its center axis.
- Lower-left corner – Lock icon. This will keep your image in proportion. Do NOT unlock this unless you’re okay with a skewed image. It’s best only to unlock it when you are dealing with basic shapes. Otherwise, you end up with “house of mirror” images.
- Bottom right-hand corner – Arrows for resizing. Click and drag on this corner to make the object larger or smaller. Use your ruler and guidelines (or the numbers for size up in your toolbar) to determine the size you want. This is just one way to resize an image in Cricut Design Space.
You can find measurements in a faded black color along the edges of the selection box that show you the current size of the object. This is SUPER helpful when you want to verify the size quickly!
Editing Menu
This part of the menu is the meat and potatoes of this program. This is where you will edit, arrange, organize fonts, resize objects, and more. This menu runs most things on your canvas area.

1. Undo And Redo
This toolbar feature is a universal tool in most programs and apps. Click the undo button when you want to change something you don’t like or if you make a mistake.
It’s also a great safety net while you experiment! Try something new in the tool panel. If you don’t like it… hit the undo button.
The redo button works similarly. If you make a change, undo it, and then decide you want to keep that design change, you can go back to it without having to go through the steps. This only works if you really want to “step ahead” and replace the change you backed away from.
2. Font
When you click on this panel, you can choose any font you want from the dropdown options. If a font has a “Green A” icon next to it, you can use this font only if you have Cricut Access.
If you don’t have Cricut Access, you will want to use the fonts on your computer system. Otherwise, you’ll be charged when you send your project to the machine to cut.
3. Style
This is exactly like Word or Google Docs. Once you have chosen your font, you can style it. Here are your options:
- Regular – This is the default setting for the font. You will use this setting to reset your font if you choose one of the other settings and want to go back to the regular style of the font.
- Bold – This is a thicker version of the font.
- Italic – This option tilts your font to the right (slants it).
- Bold Italic – Slants and thickens the font.
Font Size: This is where you will change the size of your font. You can use this tool to adjust your font size or just drag and resize your font in the canvas area to visually see how it looks on your design.
4. Linetype And Fill
All the power of your machine and its crazy amazing craftiness happens right here. This is where you get to tell your machine that you want to print and then cut, draw a line, score a line, or cut a line.
Linetype
There is a dropdown menu and it allows you to change the type of line you want your Cricut to create. Cutting happens with a variety of blades, drawing is used for Cricut pens (or you can look up how to use other pens in your machine), and the Score happens with a scoring stylus or a rotary wheel.
- Cut – This is the default lenitive, and all of your elements on the canvas will have this as an option. The only time that it won’t be an option is if you upload your own JPG or PNG file. These you will have to specify what type of line you want. Having lines designated to CUT mean that when you press the MAKE IT button, your machine will slice along these lines.
- Draw – It’s just like it sounds. If you select this as your line type, then your machine will ask you to load a pen, and it will draw out the design in whatever color pen you chose. When you click MAKE IT, your machine will follow the lines with the pen and illustrate what you have on the canvas.
- Score – The scoring wheel will only work with the Maker. Other Cricut machines can use a scoring tool (similar to a pen). All your lines will be dashed when you select this option, and your machine will score the lines, not cut them out.
Fill
This option is for printing and for patterns that you might add to your design. It can only be used when you have CUT selected as your line type. By contrast, no fill is the default setting. It tells the machine that you won’t be using the print and cut feature for your project.
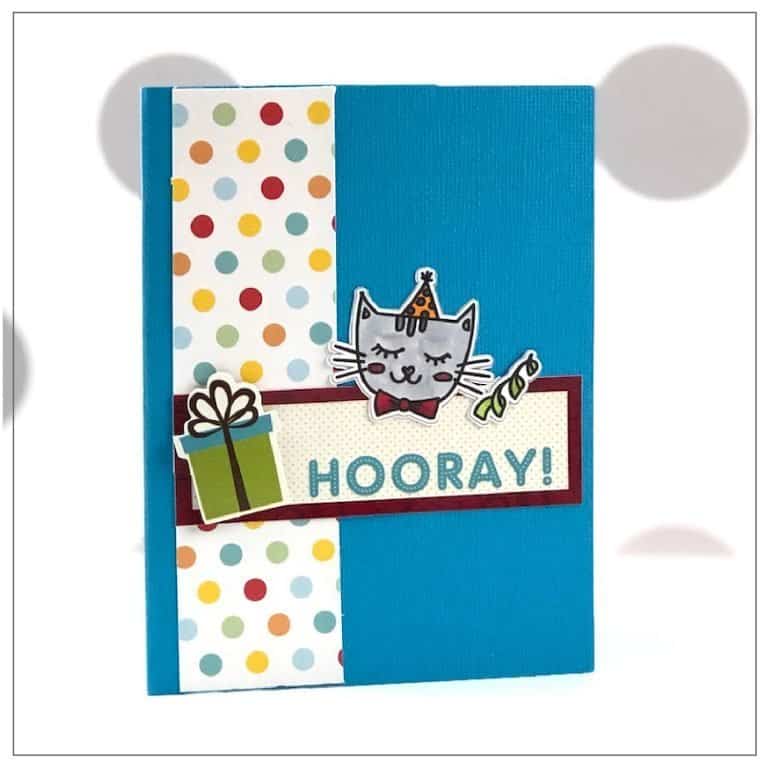
Pro Tip: PRINT is the option that lets you print a design on your regular household printer and then have the outside of the design (or other elements) cut out by your machine. This option saves you hours when you need to make party favors for your 75-100 guests. 😁
Goodbye scissors and sore hands!
5. Select All
This is the tool that you will use to select everything on your canvas. Once you have them all selected, you can move and rearrange them as needed.
6. Edit
You will find your CUT, COPY, and PASTE commands here. Click on the icon to show the drop-down menu and reveal the 3 options. This tool is only activated when you have an element on your canvas selected.
7. Align
Using this tool will save your sanity. Get familiar with it because it’s your best friend in the design world.
In addition, if you learn these tools, you will be able to transfer those skills to more robust design software like Adobe Illustrator in the future. You can find these same tools in Microsoft Office, InDesign, Photoshop, and other quality software programs.
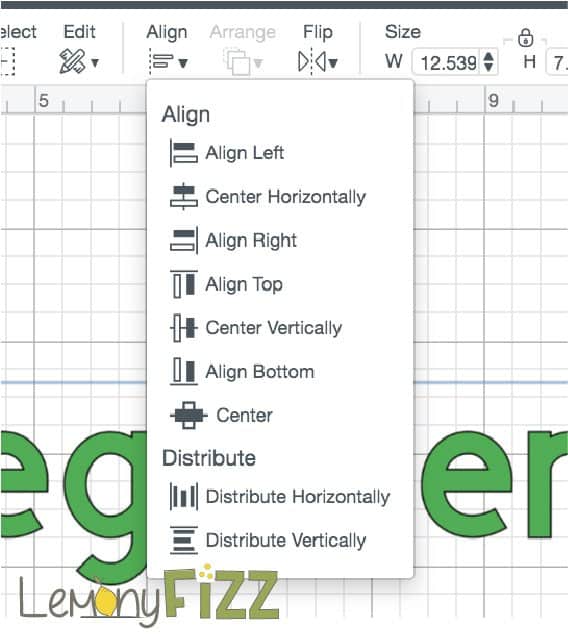
Click on the ALIGN button to show the dropdown and view all of your options. You can see all of the different variations of this tool on the image below…
NOTE: You need to have the elements you want to manipulate selected before you click on the tool option. If you can’t remember what a tool does, look at the icon and see where the line is. This is a visual cue about what it will do for you.
Left Align (aka align left)
The elements you have selected will all align along the left edge with the furthest object on the left.
Center Align (aka align center)
This tool will align all selected objects along their centerline.
Right Alight (aka align right)
Selected elements will all be aligned to the right edge of the furthest object on the right.
Align Top
Selected elements will all be aligned by their top edge and will move to the selected object that is the highest on the canvas
Center Vertically
This option will align all your selected objects in a row and line them up by their center (not their top or bottom).
Align Bottom
All your selected objects will align with the object closest to the bottom of your canvas and will be aligned along their bottom edge.
Center
This option will pull all of your selected objects and align them by their center both horizontally and vertically. It basically sucks them all together at their center point.
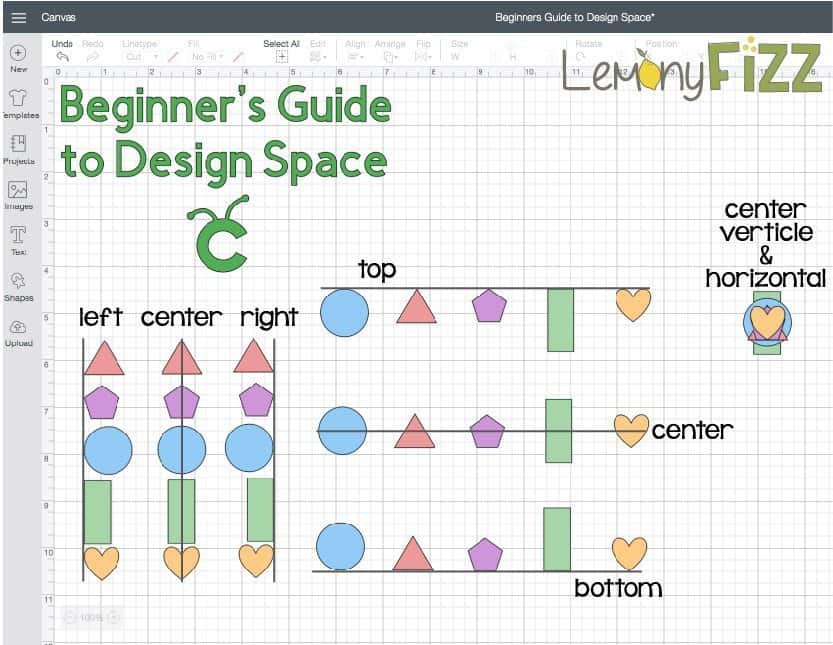
Distribute
This is where it gets really fun! Each of these sets of shapes has been distributed evenly (either horizontally or vertically with the exception of the centered pile of shapes).
- Distribute – Using this option, you can space out objects with the perfect equal amount of distance between each element. Move the first object where you want it on the left. Move the last object where you want it on the right. Select at least 3 elements (including your left and right element) and then hit the DISTRIBUTE button. They will all spread out evenly. Beautiful.
- Distribute horizontally – This button will distribute your selected items (3 or more) along a horizontal line. Your furthest object on the left and your furthest object on the right will determine the spacing. It will place all other objects evenly within the middle.
- Distribute vertically – Works the same way as the horizontal button, but it will distribute your items from top to bottom. Arrange one element at the top and one at the bottom, and then distribute the other elements evenly between the two.
8. Arrange
If you have more than one element on your canvas, you will need to be able to arrange them and determine which object is in front of another. If you only have two elements, then it’s easy to figure out which one goes to the front and the back. But it gets a little tricky when you have 5+ elements!
When you get multiple items, you may need to move an object back behind 10 or more other items. That is where this tool becomes powerful. The arrange tool lets you dictate which element is in the very front and which element needs to move to the very back.
The best way to think about this tool is to imagine that you have layers of glass with your element painted on the glass. You can see through the layer to the objects behind. If you need to move an object forward or backward to make your design more appealing, select the object (on its own piece of glass) and rearrange the order of the stack.
See It In Action
Now instead of being on the top of the stack, it is 3 pieces under the top. You can see this with the different colored shape on this canvas:
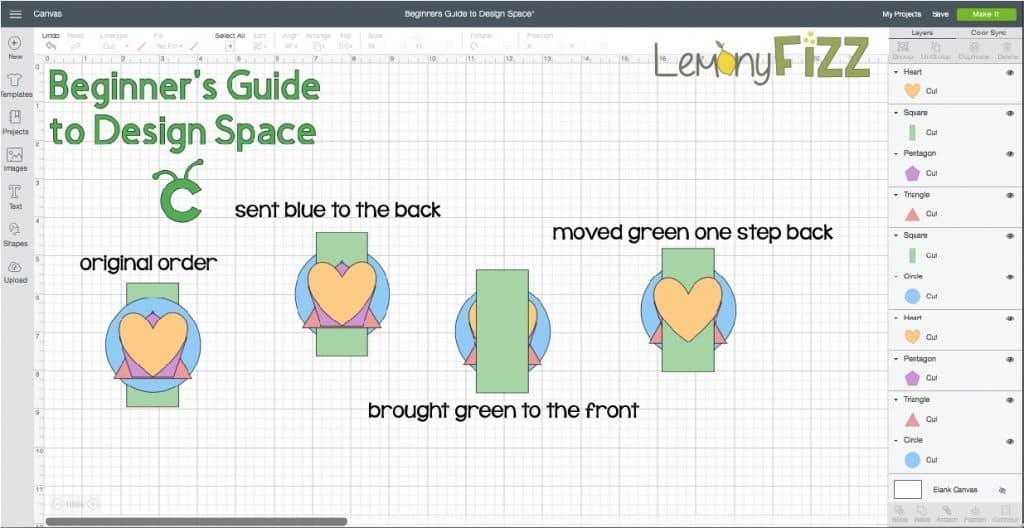
- Send to back – This tells the object you have selected to move all the way behind ALL the other elements on your canvas.
- Move backward – Use this option to move the object just one step back. It will move behind one other object (the one that it was in front of). You can use this option as many times as you need to. Maybe it needs to move back behind 3 objects, but not all the way to the back.
- Move forward – This option works the same way, only this time you are moving the element in front of the object that is directly in front of it on your canvas.
- Send to front – The selected element will move all the way to the front of the design (or the top of the glass stack).
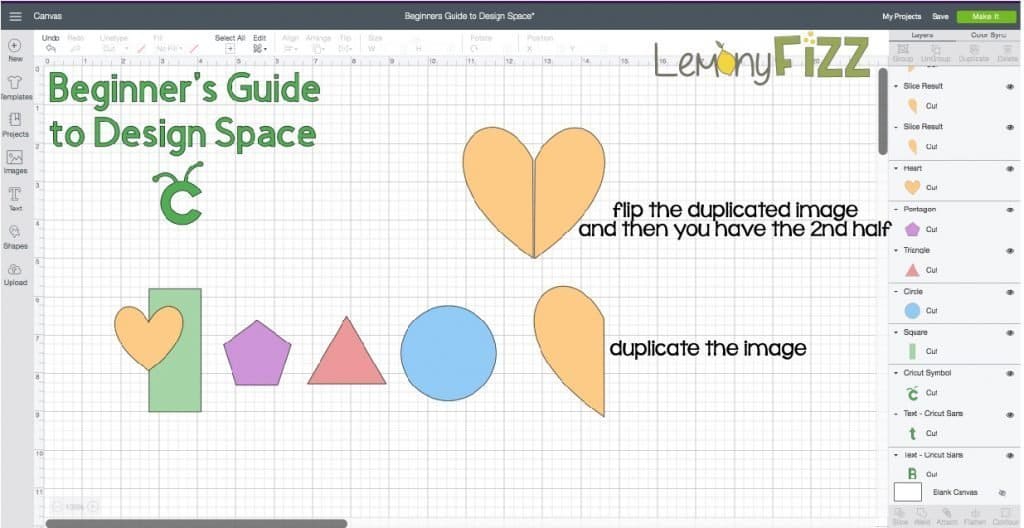
9. Flip
Using this tool will reflect your image along the horizontal or vertical axis depending on which way you choose to flip the object.
You will use this tool when you want a design element to face the opposite direction or to have a shadow (think reflection). It also works great if you need a design that is perfectly symmetrical.
If you’re like me and you can always draw one side of a heart perfectly but not the other, then this tool is for you. Copy your image. Paste it and then use the FLIP HORIZONTAL tool to turn the image the other way. Now you can scoot them together and weld them, so you have a beautiful full heart.
10. Letter Space And Line Space
These two tools are used for your fonts. If you have letters that need more distance between them (left to right), you will use the letter space tool. If you want more distance between your text lines, you will use the line space tool. You can also use these tools to squish your letter or lines closer together.
11. Size
Every object on your canvas has its own dimensions and size. You can use this tool to get exact sizes (instead of grabbing a corner of your design and moving it to make it bigger or smaller). It’s a more precise way to get an object resized. This is the other way to resize an image on Cricut Design Space.
The “lock” icon in the center means it is keeping your design proportional. This is SUPER important if your element is an image that shouldn’t be skewed. If you change its width and not its height, it is going to look wonky.
DO NOT unlock this unless it is an image like a rectangle or something that you can adjust one dimension without adjusting the other, and it won’t mess up the image. Otherwise, you end up with a “house of mirrors” image.
12. Alignment
This is exactly like a word processing program and is used for your text. You can align your text to the left, center, or right.
13. Curve
Use this tool to put your text on a curve. Slide the toggle to the left or right to create a curve up or down. Sliding it all the way to one side or the other will make a full circle with your text. One of the easier ways to put text on a path!
14. Advanced
I’m not sure why they call this tool “advanced”. It’s just a fancy way to separate and organize your text.
- Ungroup to letters – Selecting this option will put each of the letters in your word or phrase into its own separate layer (using the glass analogy again… they each get their own pane of glass).
- Ungroup to lines – Each line will separate into its own layer. If you have multiple lines in a paragraph, they will separate to a layer per line, and then you can move them around however you choose (maybe one to the left, one in the middle, and one to the right…or around an object).
- Ungroup to layers – If you have chosen a font with multiple layers (think shadows or borders), you can ungroup the font and manipulate the different layers of the text. Maybe you don’t want the shadow, or you need to change its color. This would be the tool to use.
15. Rotate
Select an object and then use this tool to turn or tilt it a set number of degrees. Maybe you want to have it lay on its side or rotate 180 degrees? This button will let you change the angle of an object.
16. Position
This is the location of your object on the canvas. If you need to move it up closer to the top but moving it with the mouse isn’t precise enough, then use these coordinates to manipulate its position and place it where you need it.
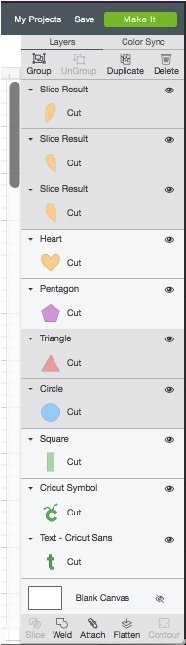
Cricut Design Space Right Panel – Layers And More Tools
Just in case you were skimming the information above, let’s go over layers again. The best way to think about layers is to think of them as glass (or transparency). You layer up all the pieces of glass in a frame, and it creates a whole image.
With a design tool like Cricut Design Space, you can select a specific layer and work on just that part of the design. You can manipulate it, rearrange it, and then put it back in the stack to show your completed design.
Sometimes you will alter an element and change its formatting (think about that text tool above that separates layers). You won’t be able to edit that text anymore, but you will be able to manipulate its shape and the location within the stack of layers.
Group, Ungroup, Duplicate And Delete
You will use these tools when you’re moving objects around on the canvas. They will save you time and help you to keep objects in place in relation to other objects.

Group
Select the elements that you want to put together. If you are moving a flower with the petals, the stem, and leaves as separate elements, you want them all to move together. Select all the elements of the flower and then click GROUP. They are now part of the same “folder” or section, and if you click on a leaf and drag it the whole flower will follow.

Ungroup
This tool works in the opposite way. Maybe you don’t want to modify the stem and leaves – you only want to modify the blossom. If you ungroup the elements, you can modify the blossom without changing the rest of the flower.
Duplicate
This is a similar tool to copy and paste. If you select an object and then click on DUPLICATE, it will replicate that object on your canvas.
Delete
Bye-bye design! Click this button to remove a selected element from your canvas.
Layer Attributes
Each element on the layers panel has an assigned attribute. It is either designated as a CUT, WRITE, SCORE, or PRINT element. To the right of the design in the layers panel, you can see which attributes the shape currently has.
You can change these attributes by selecting the element and then clicking on the LINE TYPE dropdown and selecting your action of choice.
Layer Visibility
The little eye that is in the corner of the layer can be toggled on and off. When it is off, the elements on that layer are invisible. This is awesome if you want to see how your design looks without an element (and you don’t have to delete it and then bring it back if you still want it).
Invisible items will have a slash through the eye. You can toggle it back to visible to see the element when you need to.
Pro Tip: You can click and drag on a layer and then move it up or down the list. This is a different way of using the ARRANGE tool on your toolbar.
Blank Canvas
You can use this option to change the color of your canvas. Use this option when you have a template on your canvas, and you want to see how your design will look with different colors. You can also use this if you need to see the edge of a design and if it has a white sticker shadow or not.
Slice, Weld, Attach, Flatten, Contour
These are going to be your “go-to” tools in Cricut Design Space. They are super powerful. Weld and Attach will probably be the tools that you use the most so let’s start with those.
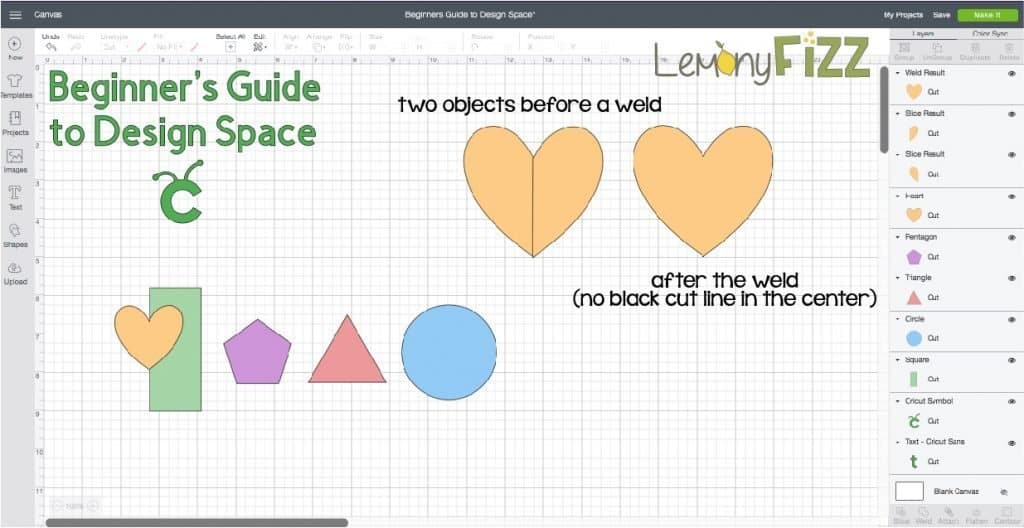
Weld
This tool allows you to combine two or more shapes into one shape. When you select the shapes and then click on WELD, you will create a whole new shape that your Cricut machine will cut along the outside edge of the design.
Attach
Using this tool is a lot like using the “group” feature. When you select your objects and then click on ATTACH, you are telling the design software that you want the layout of these elements to stay exactly as they are.
If you want your objects to stay in your designated design and layout, you need to use the attach tool or Cricut Design space may turn them or separate elements to save materials.
Slice
This tool is used to cut out shapes, text, and other design elements from other objects. It’s the tool that lets you make a negative space within a design.
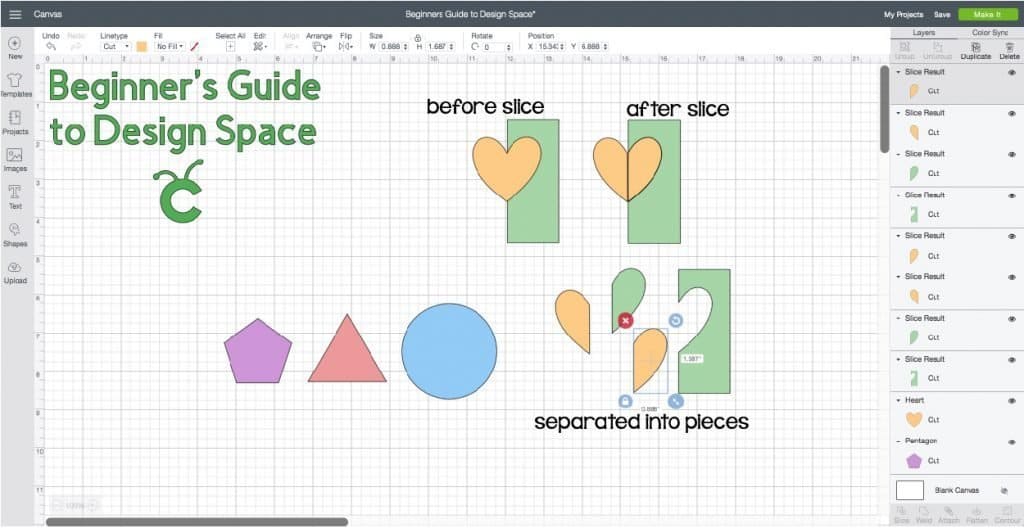
If you have two shapes overlapping and then select SLICE, the program will make individual pieces wherever those designs overlap.
Flatten
Use this tool when you’re going to use the Print and Cut layer. It might be that you purchased a design that has only cut features. You can select the parts that you want to print only and then click FLATTEN.
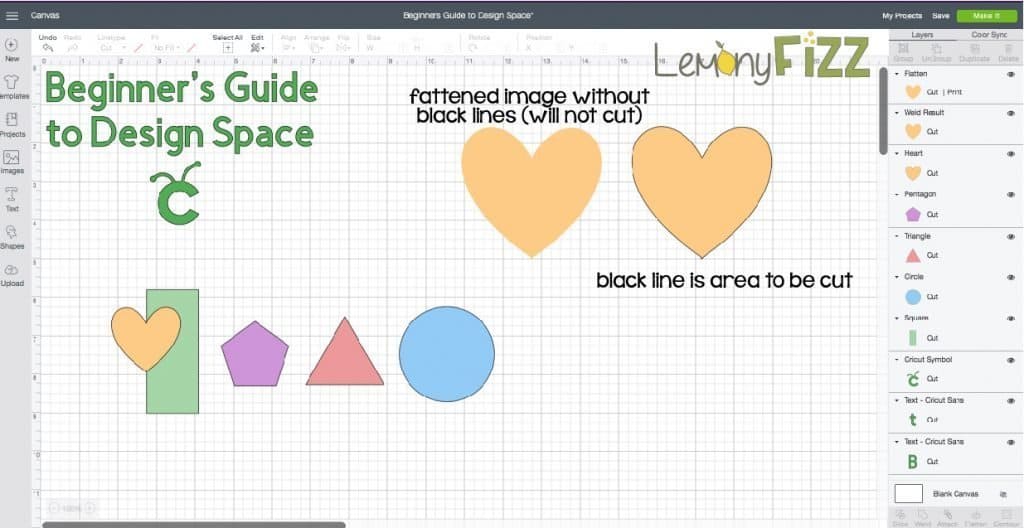
This will remove the black edge where the blade would normally trace to cut. It is now a print-only object.
NOTE: You can NOT reverse this once you save and exit out of your project!
Contour
The contour tool allows you to hide unwanted parts of an element. They are the parts of the design that you may not want to cut or that are redundant.
Color Sync
All the different colors on your canvas represent a different piece of card stock, vinyl, or other cutting material.
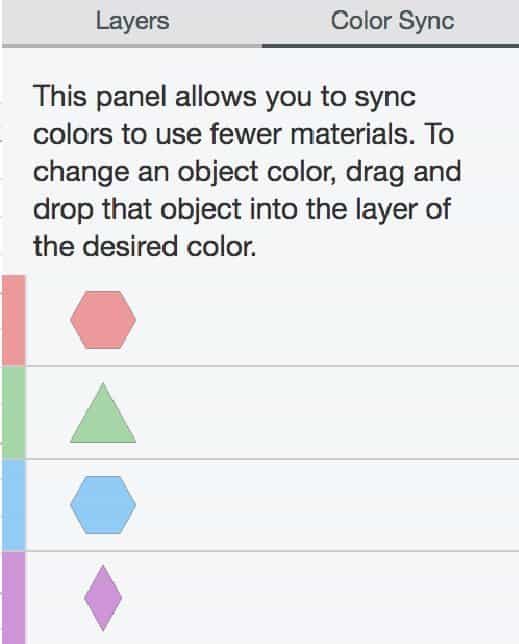
Maybe your design has 3 shades of pink, but you really only plan to cut one shade of pink. Follow the directions in this panel and drag and drop the object layer onto the one color you wish to keep. This will streamline your cut and make it, so you don’t have to load your pink cut mat 5 times for one color cut.
Cricut Design Space Is A Stepping Stone
I hope you found this tutorial helpful. There is a TON of information here to digest, so come back and read it as many times as you need to.
Please don’t feel like you need to learn it all at once. You will retain this information better as you start making projects and actually put it to use.
This is just the beginning of your crafting with a cutting machine. It won’t be long, and you’ll think that Cricut Design Space is as easy to use as your favorite paper cutter or pair of scissors. 😉
When that happens, you will be ready for the next design adventure – making your own digital designs to use and share with others!
More Cricut Help
- 9 Must-Have Apps For Cricut
- Best Vinyl Cricut Projects To Make With Your Machine
- 13 Cricut Hacks To Start Using Now To Save Money
- Best Vinyl For Cricut: A Guide To Vinyl For Crafters
- Best Cricut Tools: What Accessories To Use And Are They Essential?
Great tutorial!
I don’t understand this:
‘Score – This option is ONLY available with the Cricut Maker and you will need a Scoring Wheel or the Scoring Stylus.’
I use the score function on my Cricut Explore Air 2 with the Scoring Stylus…yet your statement doesn’t indicate this.
Thank you for the comment Becky! I have fixed the sentence so it makes more sense and clarified that the scoring wheel was only for the Maker.
Rhoda
This has been the absolute best, in depth explanation of design space that I have found so far!! Thanks for taking the time to make this I will be referring back to it MULTIPLE times 😁
The images are very helpful and not overkill like most sites! Thanks again!!
Thank you Megan!
I’m glad you found the post helpful. There is a lot to learn when it comes to playing with a Cricut. Happy to help once it is out of the box!! 😀
Rhoda
My design space doesn’t have the shirt template or the curve tool… do I need to have Windows 10? When I try and cut and print it always says project incompatible
Templates don’t print. For the curve tool, you will need to have text on your canvas. Then the tool should be on the top right of your toolbar. If you can’t access it still you might need to try updating your version of Cricut Design. I run a MAC so I know you don’t need Windows 10 for it.
Hello just finished this tutorial. Full of information that was understood and concise. I have read other tutorials and when finished was so confused I wanted to give up. Thank you so much!
How do I find my purchased cartridges on Cricut Design Space. I have v6.4.134. I used to know where to find them but not any more.
You should be able to go up to the drop-down bar (lines in the top left).
Click on those. And then click on Linked Cartridges.
There should be prompts that walk you through relinking them. I’m not much help after this point because I don’t have any to practice with 😉
Rhoda
Great tutorial! Just got explorer 3 and have watched or read many of them. Yours is wonderful. Can it be printed?