Create a Stunning Beach-Themed Scrapbook Overlay Layout with this Free SVG
We may earn a small commission for purchases made through affiliate links in this post. For more information go to our Privacy Policy.
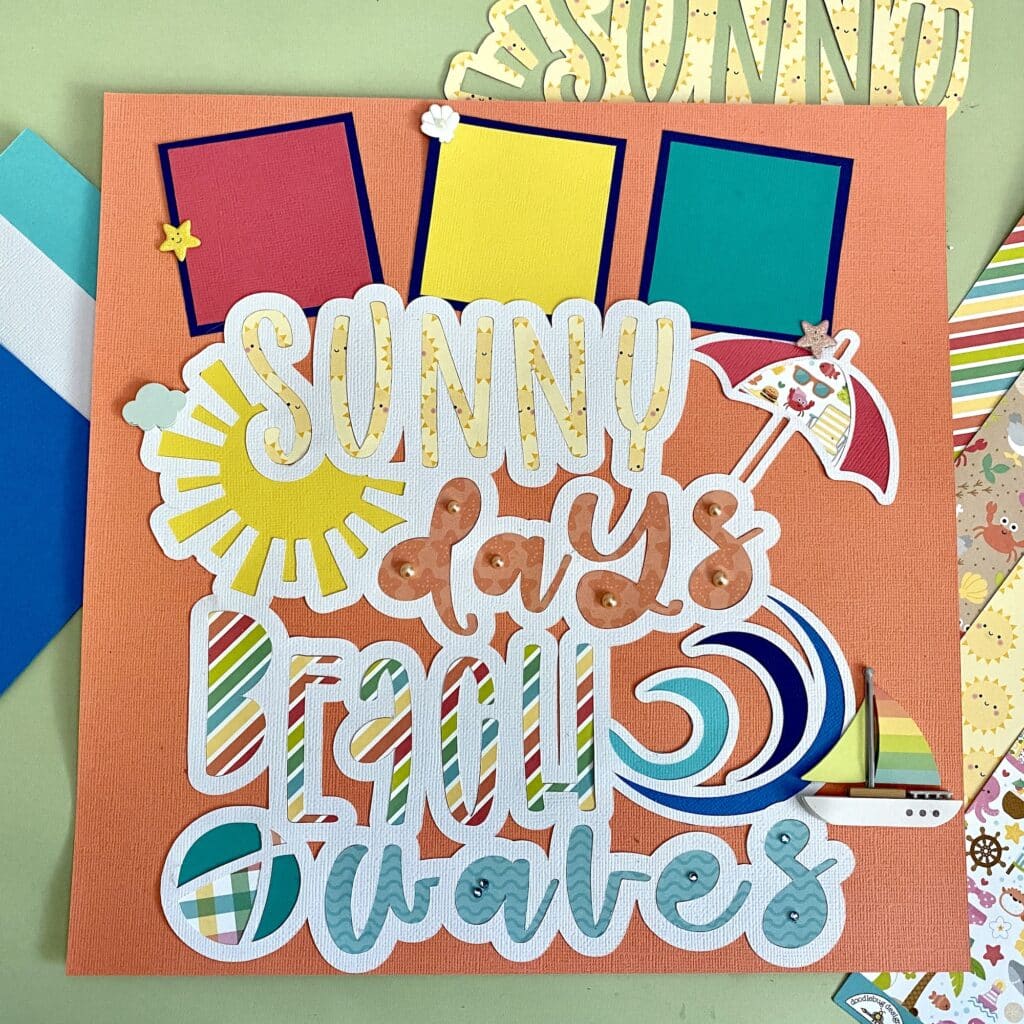
I’m excited to share with you a step-by-step tutorial on how to create a gorgeous beach-themed scrapbook overlay layout. This project is perfect for preserving your cherished memories of sunny days at the beach. We’ll be using SVG files and a Cricut machine to bring this vibrant design to life.
Materials You’ll Need for this Beach-Themed Scrapbook Page:
- SVG Overlay Cut-File (available for free in the library)
- Cricut machine (or any other cutting machine)
- White and patterned paper in various colors (yellow, blue, brown)
- Glue (I recommend Barely Arts glue)
- Embellishments of your choice (stickers, rhinestones, etc.)
- Scissors (optional for fussy cutting)
Step 1: Cutting the SVG Files
Once you’ve downloaded the SVG files from my website, upload them to your Cricut Design Space (or any other cutting software). Start by cutting the entire design in white paper.
Next, if you want to use your Cricut for details, select the individual elements like the beach, waves, and the word “sunny,” and cut them in their respective colors (blue for waves, yellow for the sun, brown for the beach).
Step 2: Filling in the Overlay
Now that you have all the pieces cut out, you can decide which other pattern papers you want to use to fill in the shapes of your overlay. Glue them to the back of each section and then cut around them (leaving a little edge so they don’t overlap into other sections).
Step 3: Adding Dimension
For an extra touch of dimension, consider fussy cutting some other elements. For instance, you can cut other shapes from pattern paper, add pre-made die cuts, stamp and die-cut other images, or repeat parts of the overlay file.
Step 4: Gluing the Design Together
With all the elements in place, it’s time to start gluing the design together. Use Barely Arts glue to secure the different layers. Take your time with this step to ensure everything is aligned nicely.
Step 5: Embellishing the Layout
Now comes the fun part – adding embellishments! Consider using a sailboat sticker to give your layout a nautical touch. You can also place rhinestones or other small decorations to mimic water droplets or add a touch of sparkle.
Step 6: Creating Photo Mounts
To showcase your beach photos, create photo mounts using leftover patterned paper. Cut them into small squares or rectangles and glue your photos on top. This will add a professional finish to your scrapbook page. I cut these photo mounts at 2.5 inches square and then the back piece at 2.75 inches square.
Step 7: Finalizing the Layout
With all the elements in place, take a moment to review your layout. Make any necessary adjustments and ensure everything looks balanced and visually appealing.
Step 8: Journaling and Personalization
Now that your layout is complete, add some journaling to document the special memories captured in your photos. Personalize the journaling with anecdotes, quotes, dates, or heartfelt messages to make the layout even more meaningful.
Step 9: Displaying Your Layout
Once everything is dry, your beach-themed scrapbook overlay layout is ready to be displayed. Consider framing it for a stunning wall decoration or incorporate it into your favorite scrapbook album.
And there you have it – a beautiful beach-themed scrapbook overlay layout that perfectly captures the joy of sunny days at the beach. Have fun experimenting with different colors and embellishments to create a layout that reflects your unique style.

